Fitting ForeSpar Flowtech Marelon thru hull valves
|
The JOD 35 Dinah decided to
remove all the original bronze thru hull fittings and replace them with
Forespar Flowtech
flush fittings. All of the old antifoul was stripped from the hull. This page details how the new thru hulls were
installed.
|
 |
Flowtech™ free flow sea valves incorporate the valve body, thru-hull and the choice of
all three sizes of hose pipe connections all in one set. These high performance valves are available for 3/4" (19.05mm) ,
1" (25.40mm) & 1-1/2" (38.10mm) hose sizes. The Flowtech™ valve pipe can be faired smooth to the boat's outer skin so
that when the valve is closed, the internal plunger and valve creates a flush, fair and fast outer surface. Made of
carbon fibre reinforced Marelon®. |
| Five were needed: engine cooling water intake, galley sink drain, head
intake and outflow and the ballast water intake. Dinah is much modified for solo and double hand sailing and
won her class in the 2009 OSTAR. The Flowtech valves were
sourced and supplied by Acky (quare name but he knows his stuff!) at Galway
Maritime. Below: struggling to remove
the original bronze mushroom fittings, well glued with sealant. A
thru hull step wrench would have been handy, but perseverance pays. Note that most of the antifoul has been
removed, leaving remnants of barrier coat. |
 |
Here the head outflow (left) and inlet (centre) have been removed. At right is the plastic speed log fitting which will be
replaced later with a flush-fit Airmar triducer for speed, depth and sea temperature. |
 |
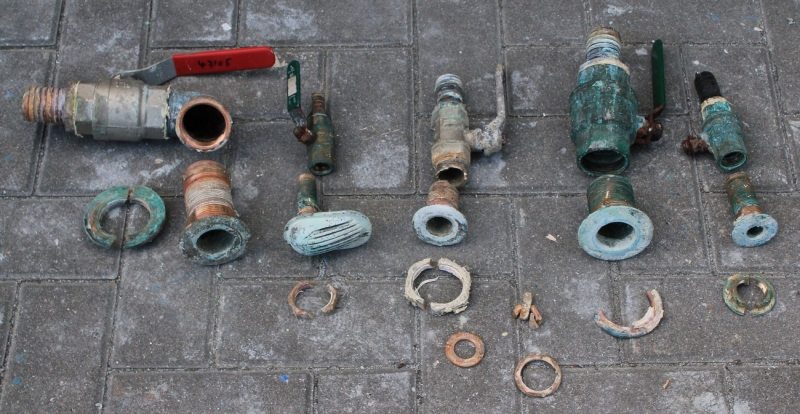
All the bronze sea cocks removed. From left: ballast water intake, engine cooling, galley sink, heads out and
heads inlet with broken handle. Eleven kgs in total. All the fittings were passed on to a friend who has an
amazing project converting an old fishing boat to a sailing ketch. |
 |
Behind the engine (fuel filter and other items pulled up to left out of my way), gelcoat has been ground back to fibreglass to promote good adhesion of epoxy resin. At left:
engine cooling water intake hole, at right the ballast water intake hole which will be connected to the white hose leading to a
centrifugal pump which fills the ballast water tanks. The white cylinder at right is fresh air pump to the engine bay. |
 |
Here two Flowtech valves stand temporarily in place. The valve at rught will connect to the ballast water hose
pipe. |
 |
Under the galley sink, bloody awkward to reach. Bilge pump hose and fresh water inlet hose are tied up out of the
way. |
 |
The FlowTech valves require a minimum hull thickness. Dinah's hull will need to be built up inside. This
piece of ready-shaped hardwood will do the job. The bolts and nuts will serve to clamp it in place. |
 |
WEST epoxy resin thickened with colloidal silica will fill any voids and uneven surfaces between the fibreglass hull and
the wood. The mixture oozes through six hourglass shaped holes to help spread the mix. The bolt heads are
held in place with large staples so that I can tighten the nuts from outside the hull without having someone inside to
hold the bolt head with a spanner. No mates this day! |
 |
Another piece in place under the sink. |
 |
Underneath the hull, large strips of plastic tape (known as farmer's silage tape) will protect against any epoxy ooze and two pieces
of offcut wood serve to clamp the hardwood in place. The bolts simply pass through the existing hull holes and are
firmly tightened. |
 |
My workshop-mixing station in the port aft cabin. I chose to pre-impregnate each piece of fibreglass before laminating
on top of the wood backer. The fabric is called Combination mat - A powder
bound chopped mat needled to a woven roving. Laminating it with a brush is messy and runs the risk of applying too much
resin which might permit the cloth to "float." I used a stiff plastic card to squeegee resin into the cloth before
laminating it to the wood and the hull. Newspaper protects the bunk from epoxy spillage and the white sheet of signage
plastic serves as a smooth laminating table. That's yesterday's Cully and Sully tomato and basil soup container to
mix in. They're sailors! |
 |
After the wood was clamped tight, excess epoxy ooze was carefully filleted around the edge of the wood. After the
ooze had gelled a bit, the combination mat was laminated to the still tacky ooze. Then, a piece thin polythene sheet was
used to further squeegee resin from the cloth and left to cure. |
 |
The same job was done under the sink. The staple preventing the bolt head from turning is obvious. |
 |
After the lamination cured, a hole saw was used to enlarge the engine intake at left, and to re-cut the ballast intake. At right is the core
cut from that. |
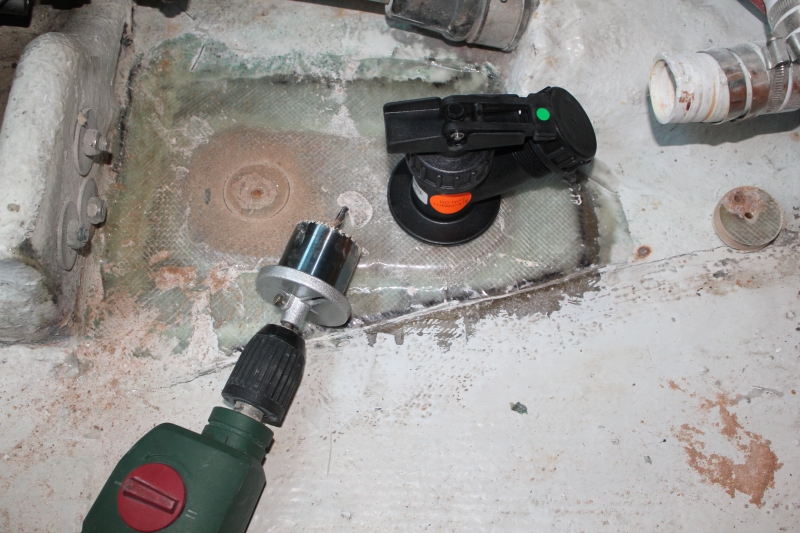 |
The two Flow tech valves are dry fit. The little Hoover I have on board will suck up the dust and acetone will
clean the cured lamination before the next step. On the valve at right, the green dot indicates "closed and
locked." On the valve at left, the red dot means "unlocked, pull up to open." |
 |
Here they extend below the hull and will be ground off when fitting is finished. |
 |
Once again, a mix of WEST epoxy with colloidal silica is used to glue the valves to the hull. |
 |
And, under the galley sink. |
 |
Pieces of combination mat with half moon cut-outs around the base of the valves are dry-fit. They further reinforce the structure to secure the
valves. |
 |
Plenty of thickened epoxy outside the hull. |
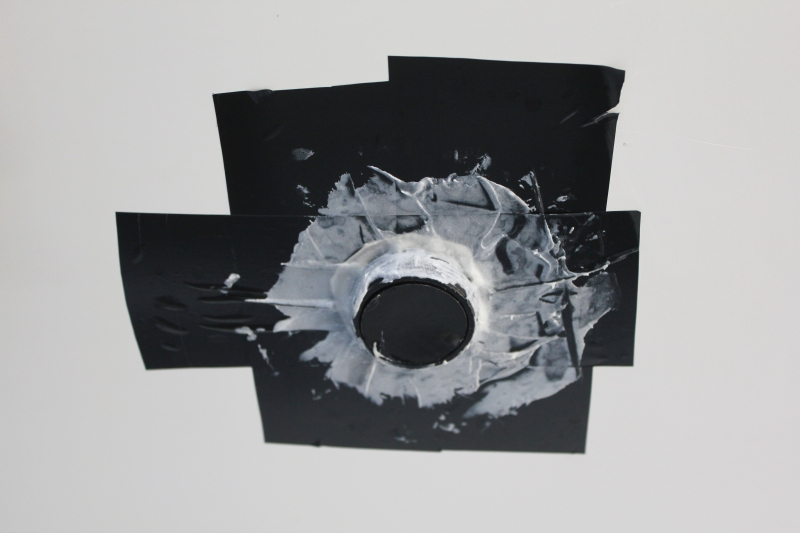 |
After curing for 48 hours, the protruding valve pipes have been taken back with a grinding disk fair to the hull. A
layer of gelcoat is next, then a lick of Interprotect barrier paint before antifouling. |
 |
The engine cooling water intake at left and the ballast water tank inlet at right wait for hose connections after fresh
white flowcoat has been applied. |
 |
The same procedure was followed in the forecabin. From left: triducer, heads intake, heads outflow. Six
pieces of combination mat were cut and laminated to secure the three thru hulls. Each piece was numbered and
outlined with a black Sharpie to help order the lamination. White areas are epoxy-silica underneath the glass
laminate. |
 |
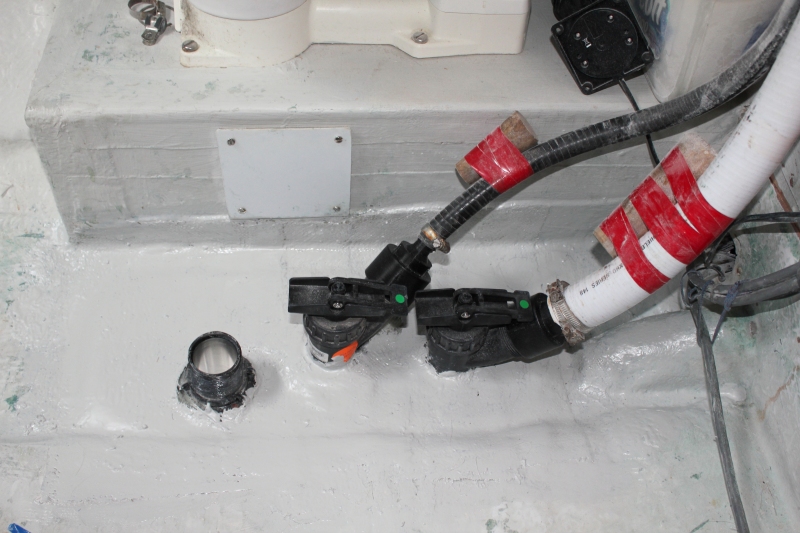
Grey Flowcoat has been painted over the cured epoxy laminate, making it easy to keep clean beneath the head (dribbles).
The triducer has been pulled at left, the heads inlet has been connected, centre (needs a second jubilee clip), and the
heads outlet at right. Will need to replace the inlet safety timber cone with a larger size. The toilet base
(top) is bolted to a plywood box, encased in glass. The white square plastic piece covers access to the nuts inside
the box holding the toilet in place. And, before and after this work, we never use the heads, a bucket is better. |
 |
Here underneath the heads. The opening in the hull was well chamfered with a Dremel tool, providing an "hourglass"
of epoxy resin that can neither push up nor down. Slight bubble imperfections were filled with gelcoat, then sanded,
ready for primer (Interprotect) and antifoul. |
 |
Finally, white International Trilux antifoul has been applied, the speedo at right has been pulled up for painting.
A simple 90 degree turn of the two Flowtech valves at left will break the paint film. Flush and fair! |
 |
| |
| |
|


